Using RBAC to Organize a SOC Web Portal
Table of Contents
- SOC Functional Areas
- What is Role-Based Access Control?
- Using RBAC to Design a SOC Web Portal
- References
Welcome back for part two of my three-post series called, A Wiki for Your SOCs. Expanding upon the previous blog post, I will now outline SOC functional areas, explain Role-Based Access Control (RBAC), and show how it can be used to organize a web portal. As before, my intent is to ultimately demonstrate how SOC personnel can use free & open-source software to track issues, share documents, and advertise information.
SOC Functional Areas
According to MITRE’s Ten Strategies of a World-Class Cybersecurity Operations Center, a SOC can be represented by three functional areas: Analysis & Response, Vulnerability Management, and Systems Lifecycle.
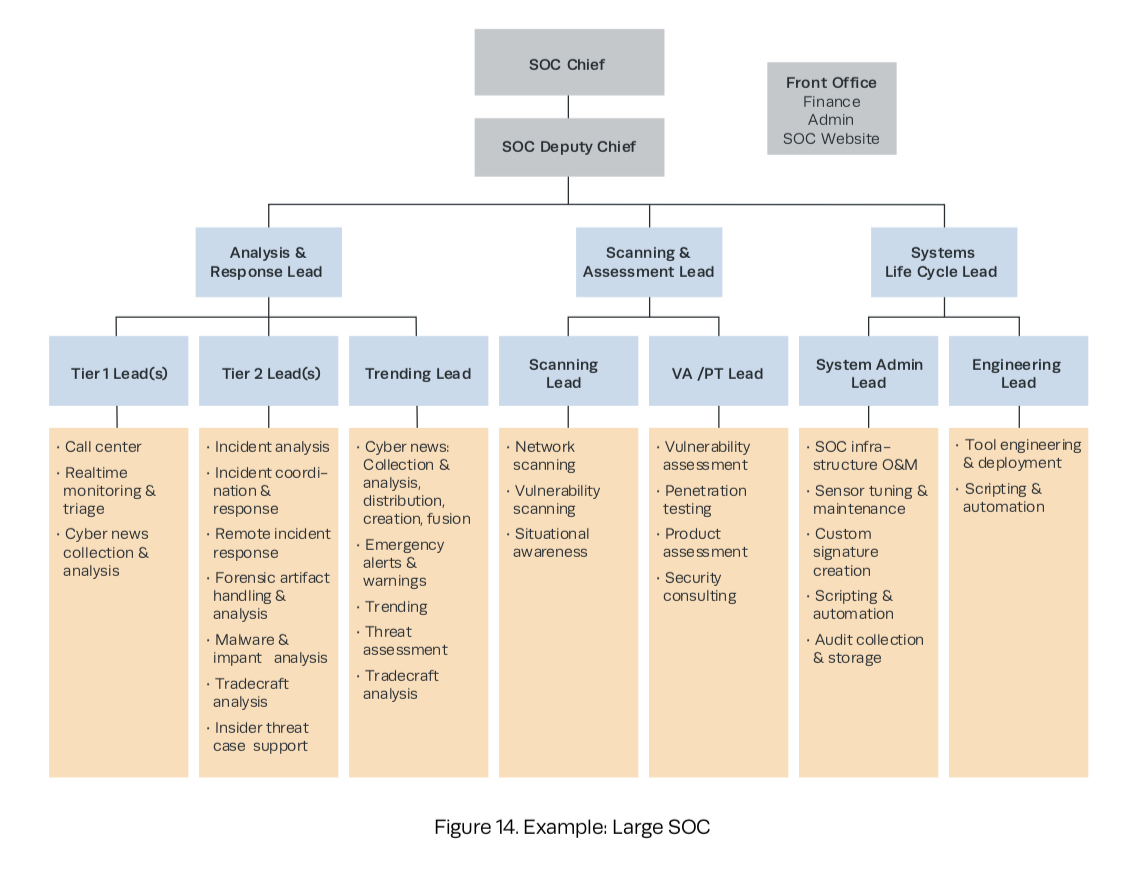
Each division serves to protect an organization’s assets through unique, but complimentary roles. For example, an Analysis & Response Division would provide triage services, digital forensics & incident response, malware analysis, and threat intelligence. A Vulnerability Management Division would perform scans, self-assessments, and proactively hunt for threats to the enterprise. Finally, a Systems Lifecycle Division would carry out the tedious, but necessary systems, network, and sensor maintenance. They would also help engineer tools and processes for the other functional areas.
What is Role-Based Access Control?
Role-Based Access Control is a technique designed to mitigate Privilege Creep and enforces the security principle of Least Privilege. Privilege Creep is when a person gains exponential access over time. Least Privilege requires a person to have the minimum amount of access in order to do their job. An administrator can implement RBAC and invoke Least Privilege by organizing users into groups and then, grant them varying degrees of access based on their role or job function.
Take the zoo for example. The person working at the front-desk does not have access to the gorillas in the back. At the same time, the gorilla handlers do not have access to the cash register upfront. Finally, the zoo manager, despite being ultimately responsible for everything, should only have access to his or her office.
Yet, RBAC can be cumbersome if not managed properly. Therefore, I recommend using a permissions model typically seen in Microsoft Windows environments called AGDLP. AGDLP involves daisy-chaining access starting with the user’s Account, their Global group, their Domain Local group, and finally, their Permission set (hence the acronym).
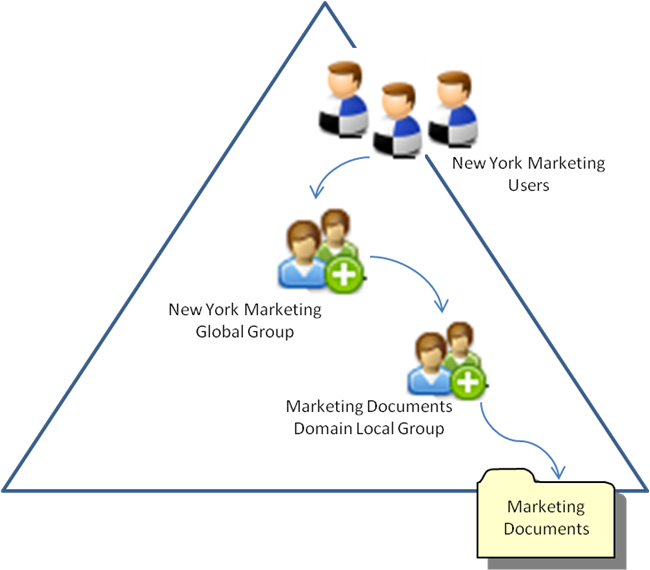
A Global group can be equated with the role an employee performs across the organization. Meanwhile, a Domain Local group represents the specific permissions they are allowed to exercise.
Let’s take the fictional company “BlunderMuffin” as a use-case. Within BlunderMuffin’s Security Operations Center, there is an employee named Jim Halpert who is responisble for Tier 2 - Incident Response. According to the AGDLP method, his access to the organization’s web portal can be expressed using the following matrix.
| Account | Jim Halpert | |||
|---|---|---|---|---|
| Global group | Incident handlers | |||
| Domain Local group | Submit tickets | Review tickets | Update tickets | Close tickets |
| Permission set | Create | Read | Update | Delete |
To implement Role-Based Access Control for the rest of the SOC, a Portal or Web Administrator would need to identify additional teams (Global groups) and then, determine their access levels (Domain Local groups & Permission sets). They would then also use this information to help structure site navigation. For example, BlunderMuffin’s SOC could be represented by the following teams.
Analysis & Response Division
| Tier 1 | Tier 2 | Threat Intel |
|---|---|---|
| First responders | Incident handlers | Threat Intel analysts |
| Forensic examiners | ||
| Malware analysts |
Vulnerability Management Division
| Scans | Assessments | Threat Hunting |
|---|---|---|
| Scan administrators | Penetration testers | Threat hunters |
Systems Lifecycle Division
| Enterprise Administration | Engineering |
|---|---|
| System administrators | System engineers |
| Network administrators |
Management Division
| SOC Leadership | Web Administration | Finance |
|---|---|---|
| SOC leaders | Web administrators | Finance personnel |
Using RBAC to Design a SOC Web Portal
Let’s use the Tiki Wiki application we installed in the previous blog post and put these ideas into practice. To start, we will need to (1) create a Web Administrators group, (2) create a Web Administrator account, and (3) restrict the default administrator account.
How to Create a Group
- Click-on Settings > Groups
- Click-on the Create group tab
- Specify the following to create a Web administrators group:
- Group:
Web administrators - Description:
Administer the web portal - Inheriance: Select/highlight
RegisteredandAdmins - Membership expiry (Number of Days):
372 days(a year and one week) - Pro-Rate membership: (leave as
Day) - Group: (leave blank)
- Group:
- Click-on Add
- Click-on Create to confirm
How to Create a User Account
- Click-on Settings > Users
- Click-on the Add a New User tab
- Specify the following to create an account for Ryan Howard:
- User:
ryan_howard - Password:
ryan_howard(use their username as their temporary password) - User must change password at next login: (check)
- Email:
ryan_howard@blundermuffin.net - Send an email to the user to enable him or her to validate their account: (uncheck; optional)
- User:
- Click-on Add
- Click-on Confirm action
How to Add an Account to a Group
- Click-on Settings > Groups
- Click-on Web administrators
- Click-on the Web administrators members tab
- Select/highlight
ryan_howardunder Add or ban users - Click-on the blue icon with the
+symbol - Click-on Add to confirm
How to Restrict the Default Administrator Account
- Login into the recently created Web Administrator account (
ryan_howard)- Use the account’s pre-defined email and password to authenticate
- Change the password if/when prompted
- Click-on Settings > Groups
- Click-on Admins
- Click-on the Admins members tab
- Click-on the wrench icon for
admin- Click-on Remove from group
- Click-on OK to confirm
- An alternative option is delete the account directly from your Tiki Wiki database.
Next, let’s (1) populate our portal with a handful of pages, (2) establish a few groups following the AGDLP method, and (3) secure one of the pages as discussed above.
How to Create a Wiki Page
- Click-on Wiki > Create a Wiki Page
- Insert name of the page you wish to create:
- Example page names for relevant SOC functional areas:
- Analysis and Response Division
- Tier 1 Section
- Tier 2 Section
- Threat Intel Section
- Vulnerability Management Division
- Scans Section
- Assessments Section
- Threat Hunting Section
- Systems Lifecycle Division
- Enterprise Administration Section
- Engineering Section
- Management Division
- SOC Chief
- SOC Deputy Chief
- Finance Section
- Web Administration Section
- Example page names for relevant SOC functional areas:
- Insert name of the page you wish to create:
- Click-on Create Page
- Copy & paste the page name into the provided text field (it’ll double as a title and filler data)
- Click-on Save
Establishing Groups Following the AGDLP Method
Using the steps for creating a group covered above, establish the following Domain Local and Global groups (I’m focusing on the Tier 2 Section for brevity and planning purposes. Yet, feel free to use this same workflow for other portions of your SOC portal as you see fit).
Consider these Domain Local groups
| Group | Inheritance | Membership expiry (Number of Days) |
|---|---|---|
| Tier 2 Section Create | Registered | 365 |
| Tier 2 Section Read | Registered | 365 |
| Tier 2 Section Update | Registered | 365 |
| Tier 2 Section Delete | Registered | 365 |
Consider these Global groups
| Group | Inheritance | Membership expiry (Number of Days) |
|---|---|---|
| Tier 2 Section | Tier 2 Section Create Tier 2 Section Read Tier 2 Section Update Tier 2 Section Delete |
365 |
| Incident handlers | Tier 2 Section | 365 |
| Malware analysts | Tier 2 Section | 365 |
| Forensic examiners | Tier 2 Section | 365 |
How to Secure Wiki Pages Using Groups
In practice, you may find it easier to leave “being a Registered user” as the minimum requirement to access a page. Yet, there may also be scenarios where a page must be exclusive. For example, in a SOC you may only want specific personnel interacting with your Tier 2 Section page (reserved for digital forensics, incident response, and malware analysis). The steps below outline how to fulfill such a need.
- Click-on Wiki > List Pages
- Click-on the wrench icon of the Tier 2 Section page
- Click-on Permissions
- Click-on the Select groups tab
- De-select the check-box for the Anonymous group
- The Anonymous group represents public access. If you leave this checked, you could accidentally grant everyone read/write access to the page.
- Click-on each group’s check-box you want to manage access for
- Example groups who may need access to the Tier 2 Section page
- Tier 2 Section Create
- Tier 2 Section Read
- Tier 2 Section Update
- Tier 2 Section Delete
- Example groups who may need access to the Tier 2 Section page
- Click-on Select
- De-select the check-box for the Anonymous group
- Click-on each check-box of the permissions you want to grant
- Example permissions to grant the groups identified above for the Tier 2 Section page
- Tier 2 Section Create
- Can post new comments (tiki_p_post_comments)
- Tier 2 Section Read
- Can read comments (tiki_p_read_comments)
- Can view wiki history (tiki_p_wiki_view_history)
- Can view page/pages (tiki_p_view)
- Tier 2 Section Update
- Can edit all comments (tiki_p_edit_comments)
- Can edit pages (tiki_p_edit)
- Can inline-edit pages (tiki_p_edit_inline)
- Can upload pictures to wiki pages (tiki_p_upload_picture)
- Tier 2 Section Delete
- Can delete comments (tiki_p_remove_comments)
- Tier 2 Section Create
- To easily grant all permissions to a group, click-on the group’s check-box at the very top
- Your Web administrators group may need full control for example
- Example permissions to grant the groups identified above for the Tier 2 Section page
- Click-on Assign
- Click-on Confirm action
To review, we just created several pages for our SOC portal and then, locked-down one of them with Role-Based Access Control using the AGDLP method. Any account added to one of the Tier 2 Section teams (Incident handlers, Forensic examiners, and Malware analysts) will have Create, Read, Update, and Delete permissions on the Tier 2 Section page. As a result, the matrix from earlier expressing Jim Halpert’s access can be updated to look like the following.
| Account | Jim Halpert | |||
|---|---|---|---|---|
| Global group | Incident handlers | |||
| Global group | Tier 2 Section | |||
| Domain Local group | Tier 2 Section Create | Tier 2 Section Read | Tier 2 Section Update | Tier 2 Section Delete |
| Permission set | Create | Read | Update | Delete |
This provides a lot of security & flexibility because only accounts organized under these specific groups will inherit access to the page. If another group needed similar access, they would be configured to inherit permissions from the corresponding Domain Local group. For example, if the SOC leaders group needed Read-only access to the Tier 2 Section page, they would be configured to inherit permissions from the Tier 2 Section Read group.
| Account | Michael Scott | |||
|---|---|---|---|---|
| Global group | SOC leaders | |||
| Domain Local group | Tier 2 Section Read | |||
| Permission set | Read | |||
Finally, let’s (1) experiment with creating & deleting accounts en masse as well as (2) establishing a Top Navigation bar to help structure our portal.
How to Create a Comma Separated Value (CSV) File
For bulk account creation, we must first draft a file ending with the .csv extension.
sudo vim users.csv
Then, make sure the first line of the file identifies the columns your data will be organized into. There are purposefully four columns in my example below (they correspond to the minimum fields required for creating user accounts).
login,password,email,default_group
dwight_schrute,dwight_schrute,dwight_schrute@blundermuffin.net,Malware analysts
jim_halpert,jim_halpert,jim_halpert@blundermuffin.net,Incident handlers
andy_bernard,andy_bernard,andy_bernard@blundermuffin.net,Forensic examiners
How to Create Multiple User Accounts
- Click-on Settings > Users
- Click-on the Import tab
- Click-on Browse…
- Select a
.csvfile (see above for a template)
- Select a
- Click-on the check-box for The user must change his or her password the first time they log in
- Click-on Add
- Your page may error-out or hang if you included any non-existing groups or previously existing user accounts. To mitigate this from happening, either manually make the groups beforehand or check the Create groups box prior to clicking-on Add.
How to Delete Multiple User Accounts
- Click-on Settings > Users
- Click-on the check-box of each user intended for deletion
- Click-on the Select action to perform with checked… drop-down menu
- Select Remove users…
- Click-on OK
- Click-on Delete to confirm
How to Create a Top Navigation Bar
First let’s lock-down the default menu on the left-hand side to Web administrators only.
- Click-on Settings > Modules
- Under Assigned Modules, click-on the tab called Left
- Click-on the wrench icon and click-on Edit
- Under Groups, select Web administrators only
- Click-on Assign
- Click-on Confirm action
- Click-on Assign
Now, for establishing a Top Navigation bar…
- Click-on Settings > Menus
- Click-on Create Menu
- Name:
Top Navigation Bar - Description:
Top navigation bar for all Registered users - Type: select
dynamic collasped (d)
- Name:
- Click-on Save
- Click-on the newly created Top Navigation Bar menu (to bring up Menu Options for it)
- Drag & drop a New option widget onto the dotted menu area
- Repeat this step as desired
- For example, I added 17 widgets total (1 for the Home page, 4 for the SOC Divisions, and 12 for the SOC Sections)
- Nest the Section widgets under their respective Division widgets (you may need to hover your cursor over the Division widget with the Section widget until nesting is enabled)
- Fill-in the Label and URL text-boxes (see below for an example)
- Click-on Save Options
- Click-on the Preview tab
- Set the Type to Horizontal
- Set the Position to top
- Click-on Deploy
- Under the Edit module: menu pop-up window, select Registered under Groups
- In the same window (under the Appearance tab), type
yin the No Title text-box- Click-on Save
- Click-on Confirm action (you’ll be re-directed to the Admin Modules page)
- Click-on Exit Modules
- Click-on Confirm action (you’ll be re-directed to the Admin Modules page)
- Click-on Save
| Label | URL |
|---|---|
| Home | http://www.blundermuffin.net/ tiki-index.php |
| Analysis and Response Division | |
| Tier 1 Section | http://www.blundermuffin.net/ tiki-index.php?page=Tier-1-Section |
| Tier 2 Section | http://www.blundermuffin.net/ tiki-index.php?page=Tier-2-Section |
| Threat Intel Section | http://www.blundermuffin.net/ tiki-index.php?page=Threat-Intel-Section |
| Vulnerability Management Division | |
| Scans Section | http://www.blundermuffin.net/ tiki-index.php?page=Scans-Section |
| Assessments Section | http://www.blundermuffin.net/ tiki-index.php?page=Assessments-Section |
| Threat Hunting Section | http://www.blundermuffin.net/ tiki-index.php?page=Threat-Hunting-Section |
| Systems Lifecycle Division | |
| Enterprise Administration Section | http://www.blundermuffin.net/ tiki-index.php?page=Enterprise-Administration-Section |
| Engineering Section | http://www.blundermuffin.net/ tiki-index.php?page=Engineering-Section |
| Management Division | |
| SOC Chief | http://www.blundermuffin.net/ tiki-index.php?page=SOC-Chief |
| SOC Deputy Chief | http://www.blundermuffin.net/ tiki-index.php?page=SOC-Deputy-Chief |
| Web Administration Section | http://www.blundermuffin.net/ tiki-index.php?page=Web-Administration-Section |
| Finance Section | http://www.blundermuffin.net/ tiki-index.php?page=Finance-Section |
As a bonus, here’s how to change the default Tiki Wiki logo see at the top left of your portal.
How to Customize the Logo
- Click-on File Galleries > Upload File
- Click-on Choose files
- Select image
- Click-on Upload
- Click-on File Galleries > List Galleries
- Click-on wrench of the file you uploaded
- Click-on Display button
- Copy URL
- Go back to the main Home page
- Click-on Settings > Control Panels
- Click-on Look & Feel
- Click-on General Layout tab
- Paste URL to “Logo source (file path)”
- Click-on Apply
Also, if you did not delete your default admin account and you need to reset its password for some reason, use the following SQL command (to bring up your MariaDB instance again, use sudo mysql -u root -p first).
UPDATE users_users SET hash = md5('password') WHERE userId=1;
Check-out the final blog post of this series to learn how the same Tiki Wiki application and portal instance can be used to create a simple Security Incident Tracking System.
References
- Digital Guardian: What is a Security Operations Center (SOC)?
- MITRE: Ten Strategies of a World-Class Cybersecurity Operations Center
- EY: Security Operations Centers — helping you get ahead of cybercrime
- IBM Security: Virtual Security Operations Center (VSOC) Portal User Guide
- Anatomy of a Security Operations Center by John Wang, NASA SOC
- How to Nest Users and Groups for Permissions
- Tiki: Understanding Tiki Permissions
- Martin Meister: AD – AGDLP – principle and functioning
- Bekim Dauti: Understanding AGDLP and AGUDLP
- ServerBrain: Windows Server 2003 Guide - Understanding AGUDLP
- InfoSec Institute: All About AGDLP Group Scope for Active Directory – Account, Global, Domain Local, Permissions
- StackOverflow: Creating an image link in Markdown format